New Lighting and Color tools in Photo AI 2
Topaz Labs has released a new v2 version of Photo AI, their one-stop photo enhancement software for macOS and Windows. The new version includes improved Photoshop compatibility (upscaling is now supported), improved raw file support, new sharpening and denoising AI models, plus two new AI-driven tools: Adjust Lighting and Balance Color.
I reviewed Photo AI back when it was first introduced, and also restored some vintage photos to see what it could do. Overall, I found Photo AI to be a powerful corrective tool for denoising, sharpening, reconstructing, and upscaling; especially with older DSLR digital images captured using high ISO values and soft focus. Over the past year, Topaz Labs has consistently updated Photo AI on a weekly basis; delivering more than fifty updates that have further enhanced and polished the software.
I've been doing some experiments with the earliest publicly-released version of Photo AI V2 (v2.0.0) and have some initial thoughts about the new Adjust Lighting and Balance Color tools. At the time of this writing, these new tools only function with TIFF images, not DNG, but Topaz claims they will update the app with DNG support in the near future.
Let's begin with Adjust Lighting.
Adjust Lighting
Adjust Lighting adjusts exposure by brightening and darkening regions of an image to improve tonal balance. The tool is especially useful with underexposed, overexposed and backlit images. Think of it as a "smart" exposure tool that adjusts highlights, midtones and shadows to create a more nuanced, professional look.
Here's a before and after comparison using Adjust Lighting, where I simply enabled the tool, with no additional edits. Straight out of camera raw file on the left, TIFF image with Adjust Lighting on the right.
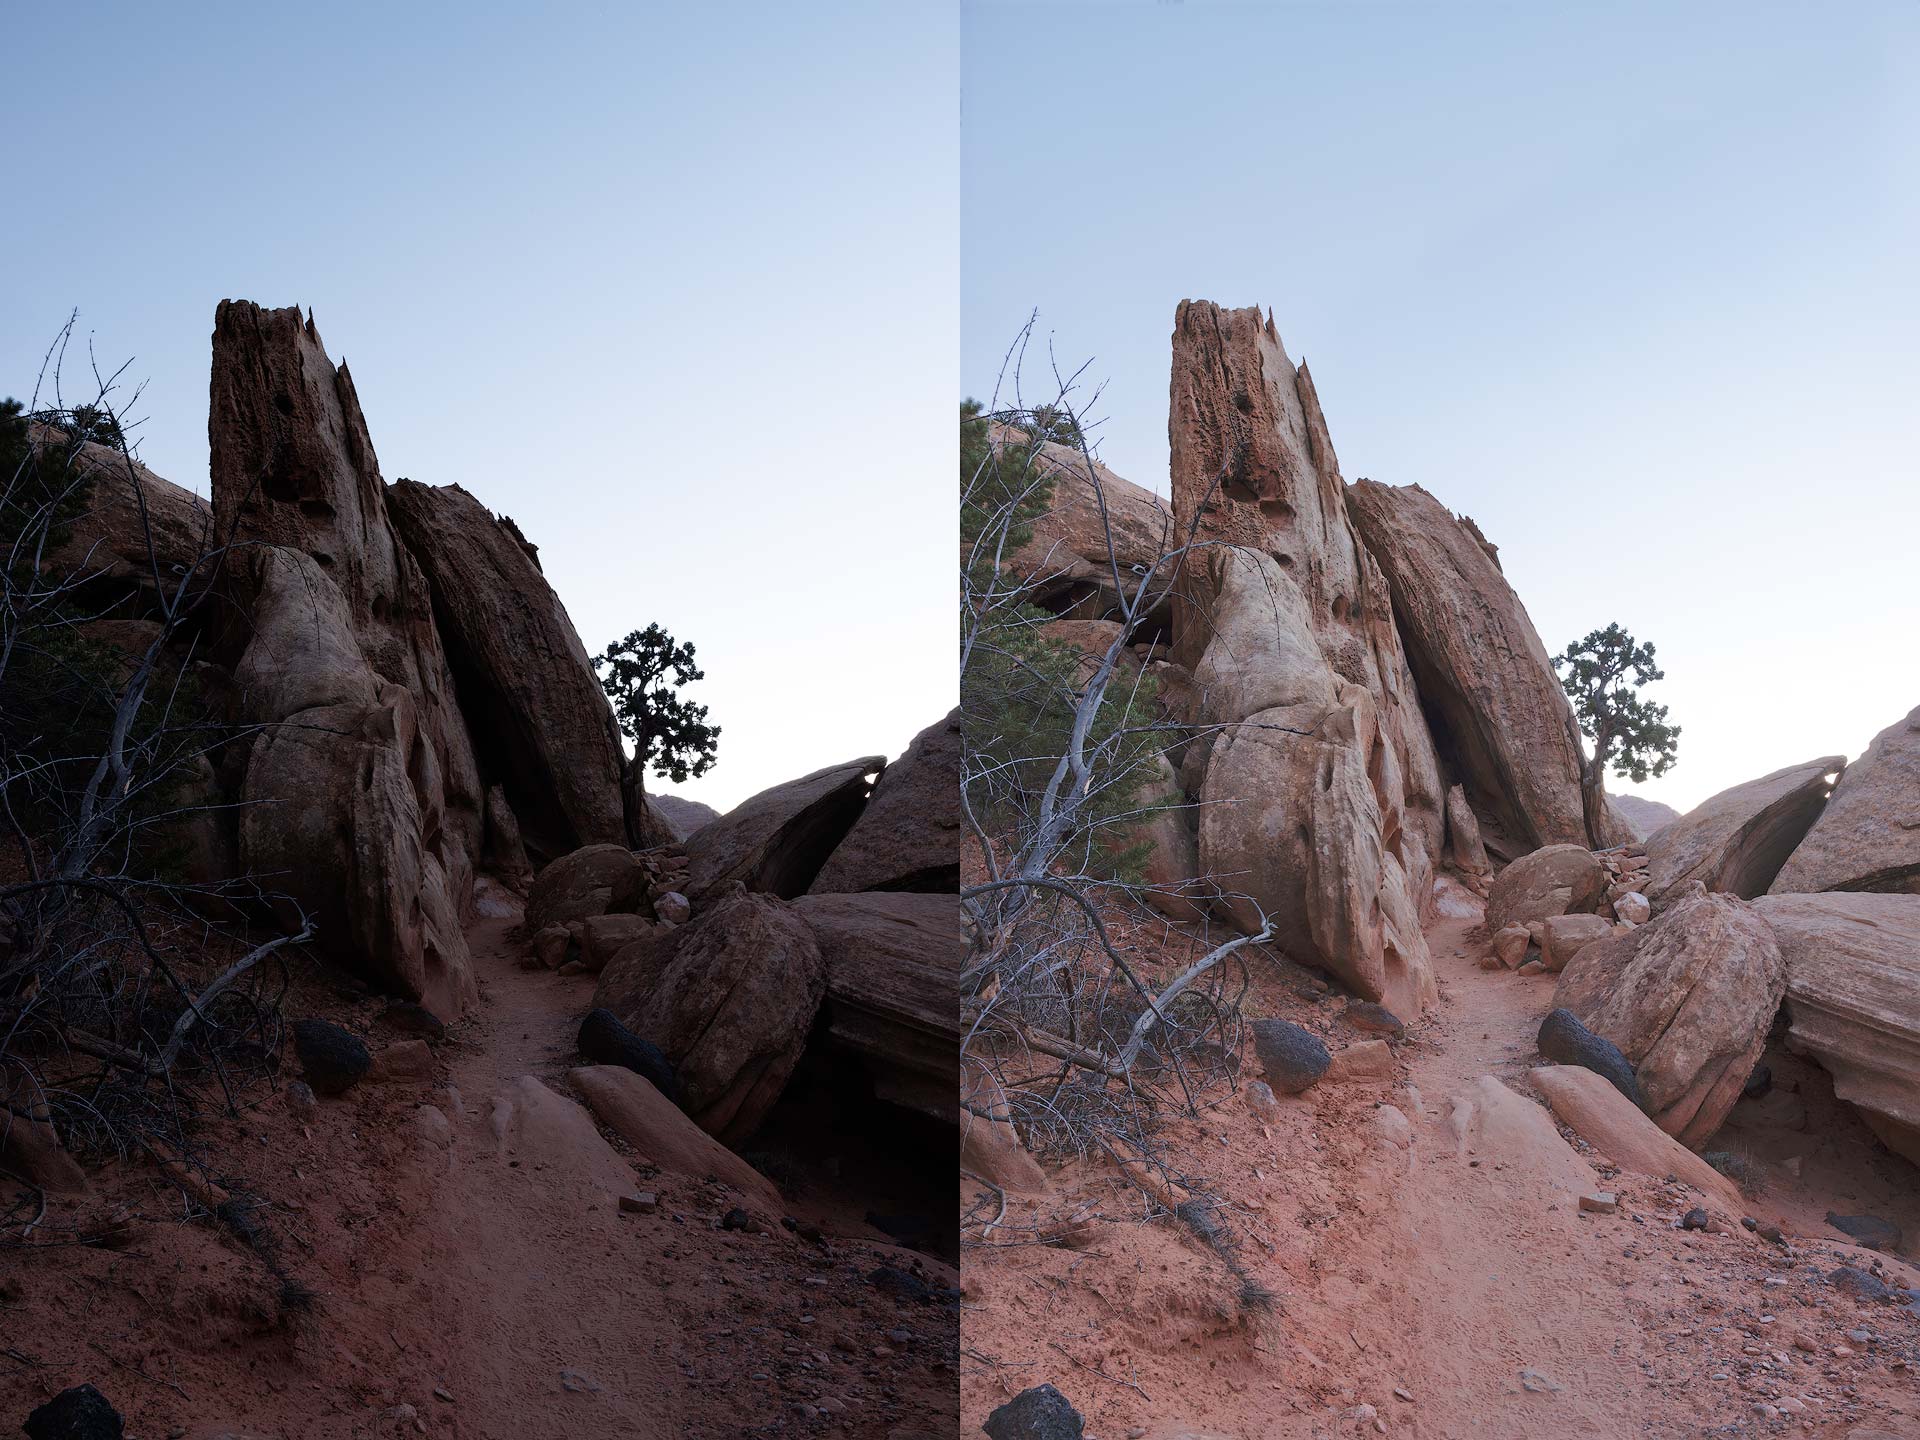
The shadow lift is a little strong for my taste, but that can be dialed-back by lowering its strength. Overall, Photo AI did a good job of brightening the background without clipping highlights in the bright sky. The result looks balanced and natural, without going overboard into faux HDR. Would be a good baseline for additional dodging and burning edits in Lightroom and/or Photoshop.
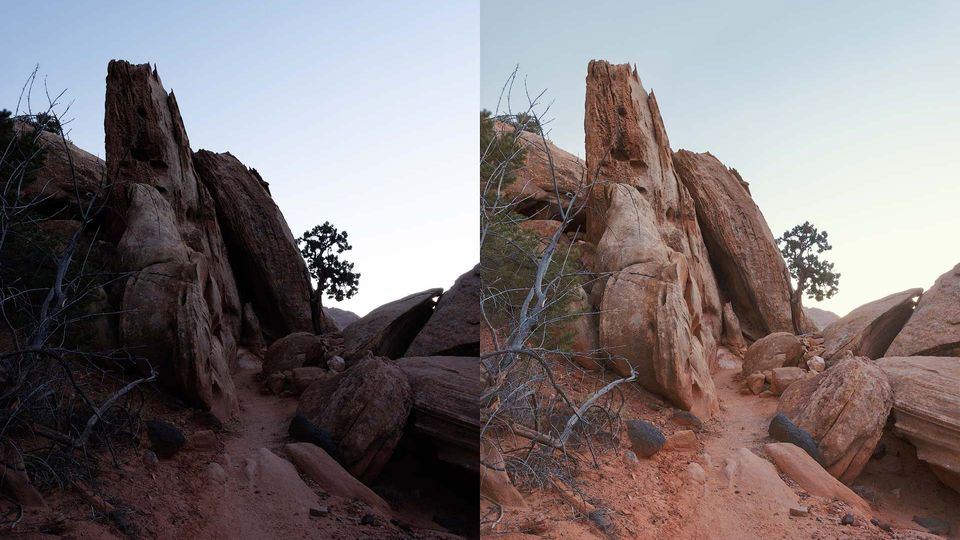
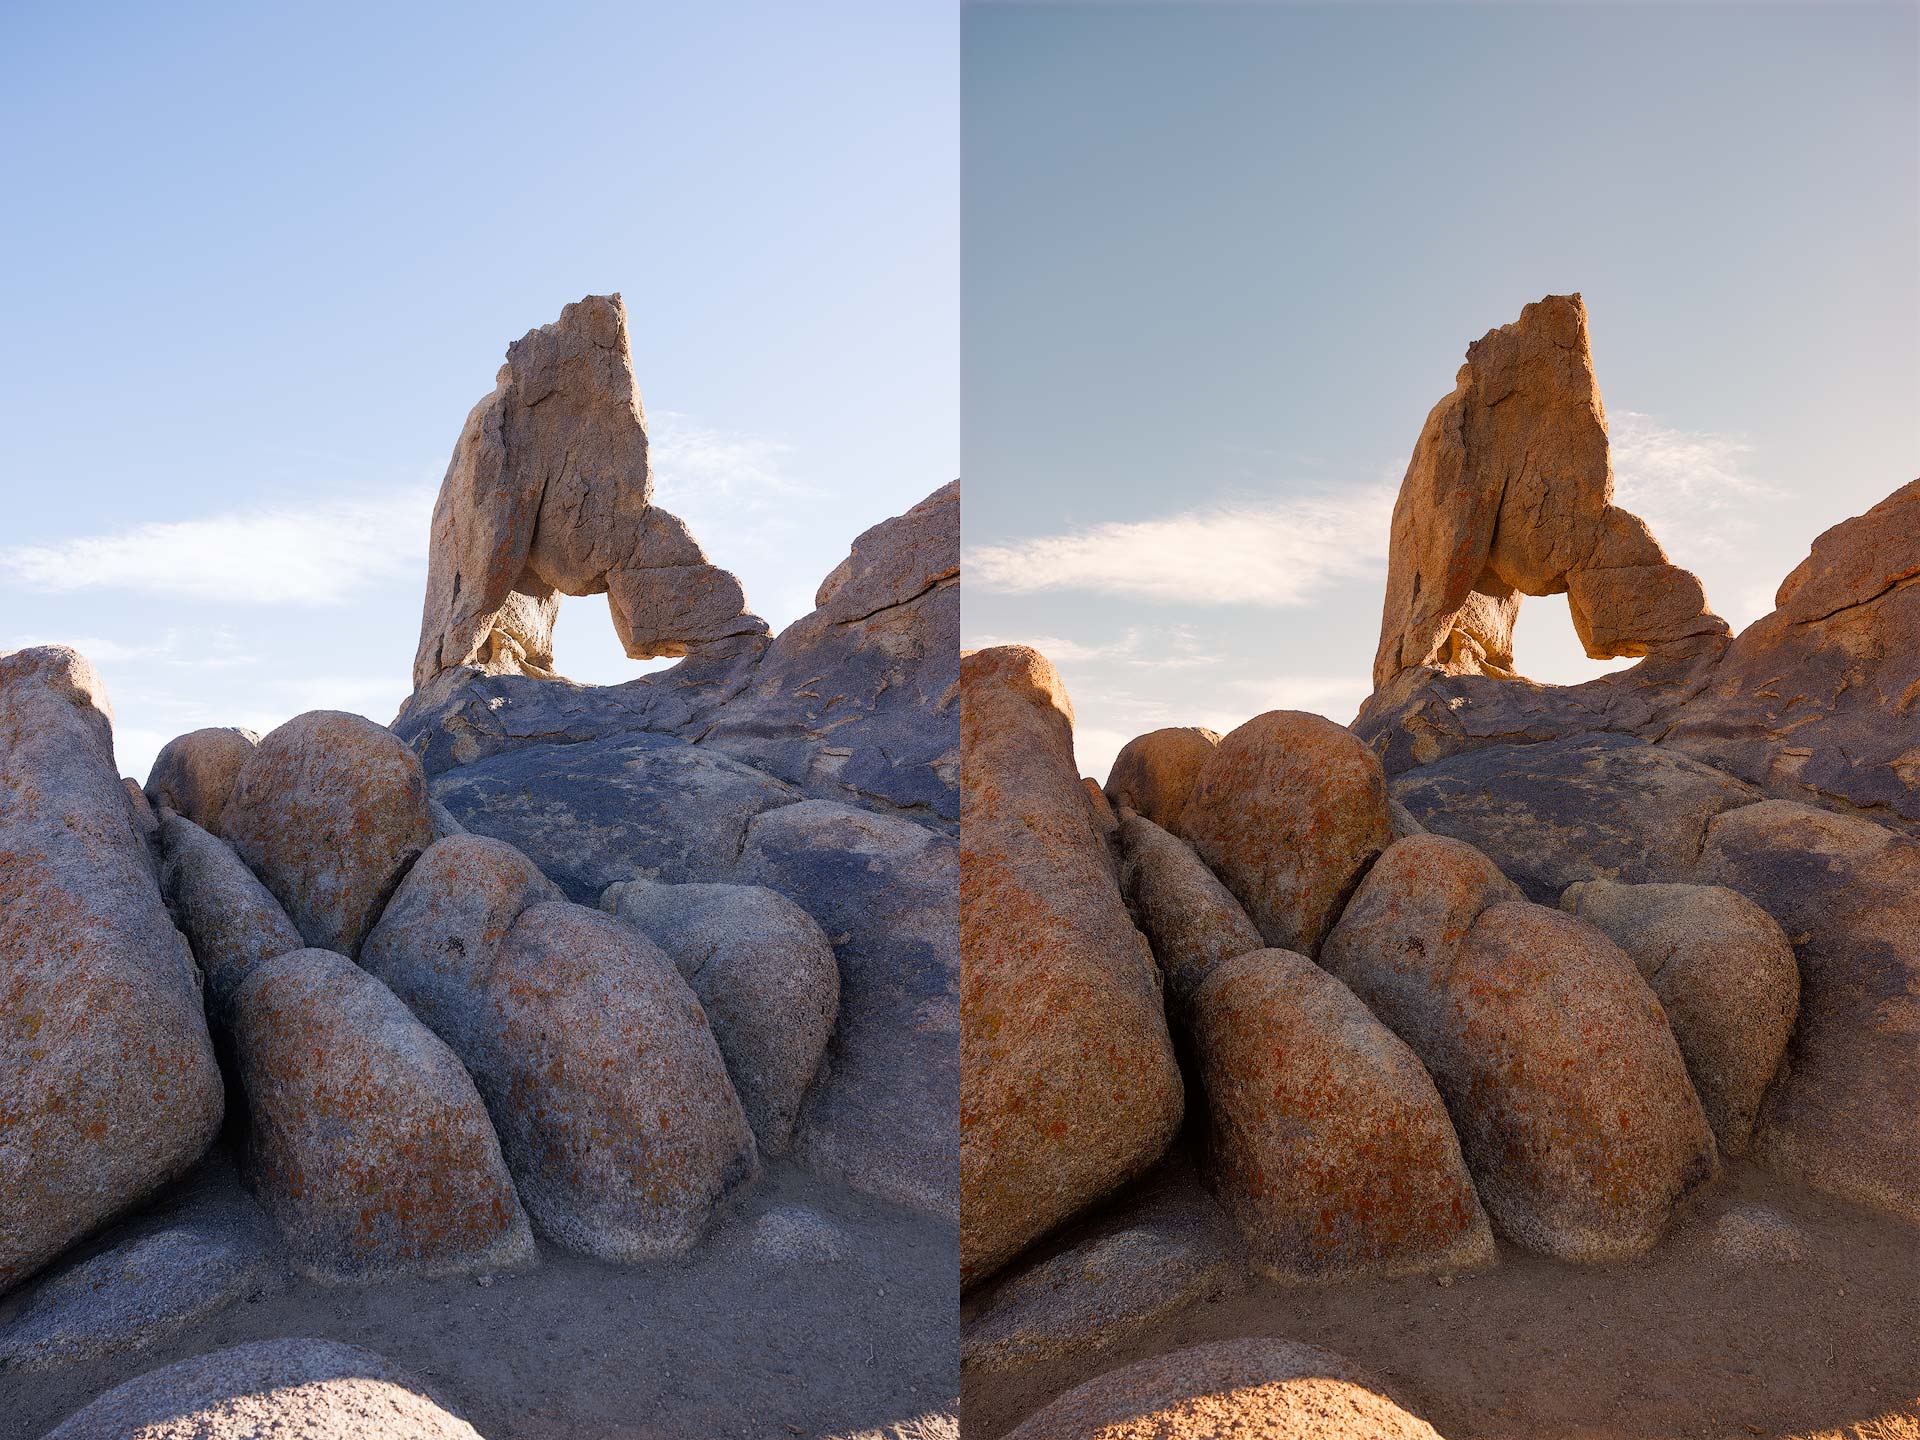
Let's try Adjust Lighting with another landscape image. Image on the left below is straight out of camera, image on the right is the same image with Adjust Lighting applied.
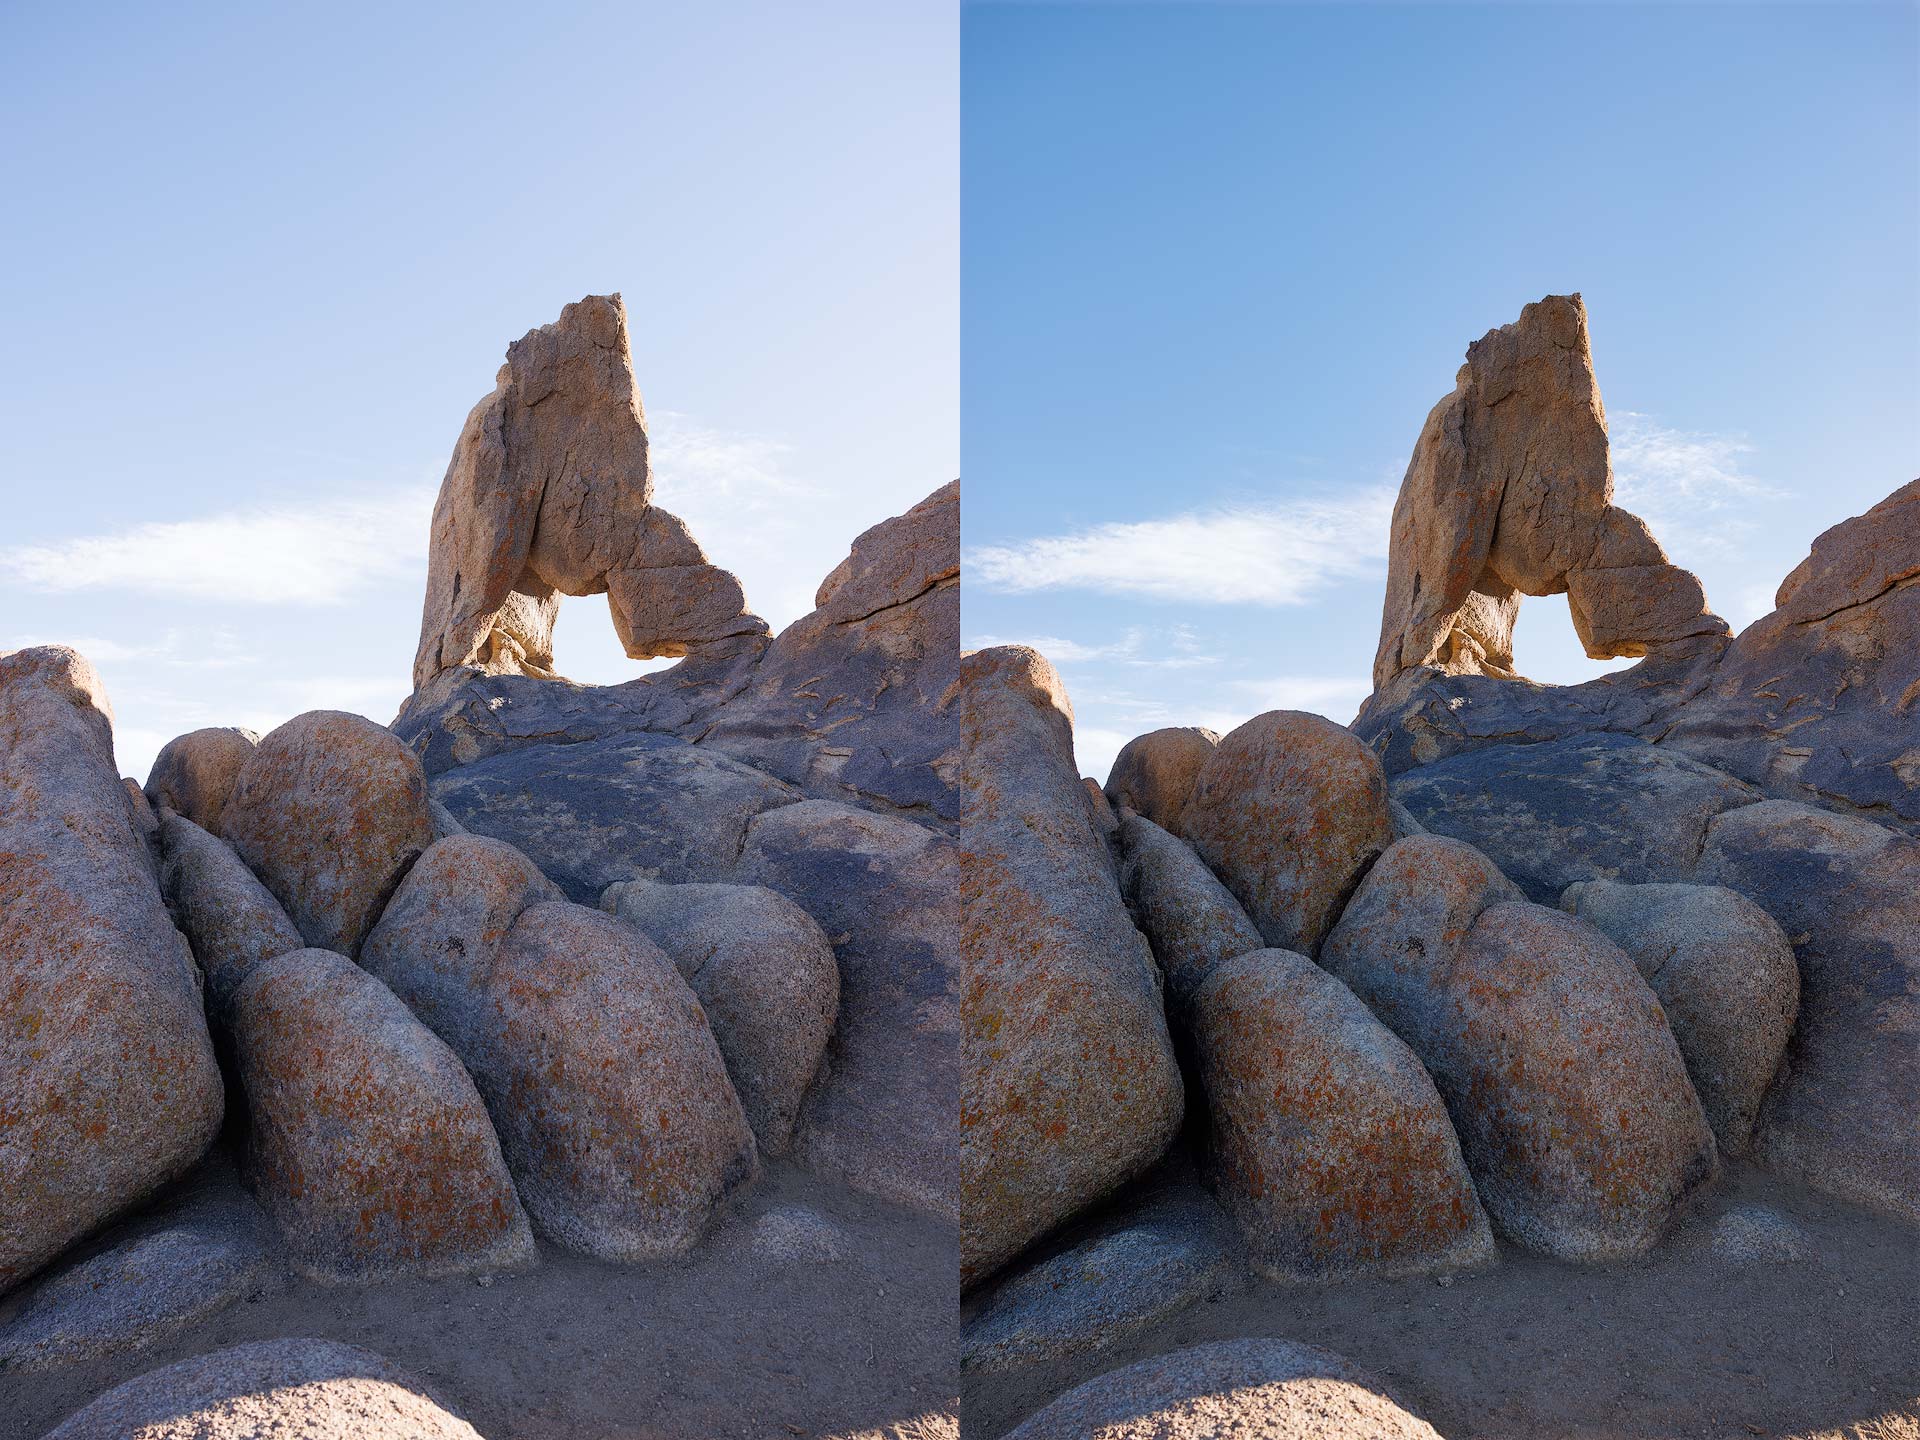
Unlike the first image, this time Adjust Lighting has reduced the brightness of the sky and darkened the foreground to create a more balanced exposure. Again, I think the results look natural, balanced, and thankfully not overdone. This would also be a good baseline for additional tonal adjustments and color grading.
Balance Color
Balance Color is a "smart" white balance tool. It automatically adjusts color temperature and tint to remove color cast, then makes selective color toning adjustments to warm and cool different regions of an image for improved color harmony and balance. Balance Color includes two adjustable sliders: Temperature and Opacity.
Let's add Balance Color to the same images from earlier and see what we get. Straight out of camera on the left, Adjust Lighting and Balance Color on the right.
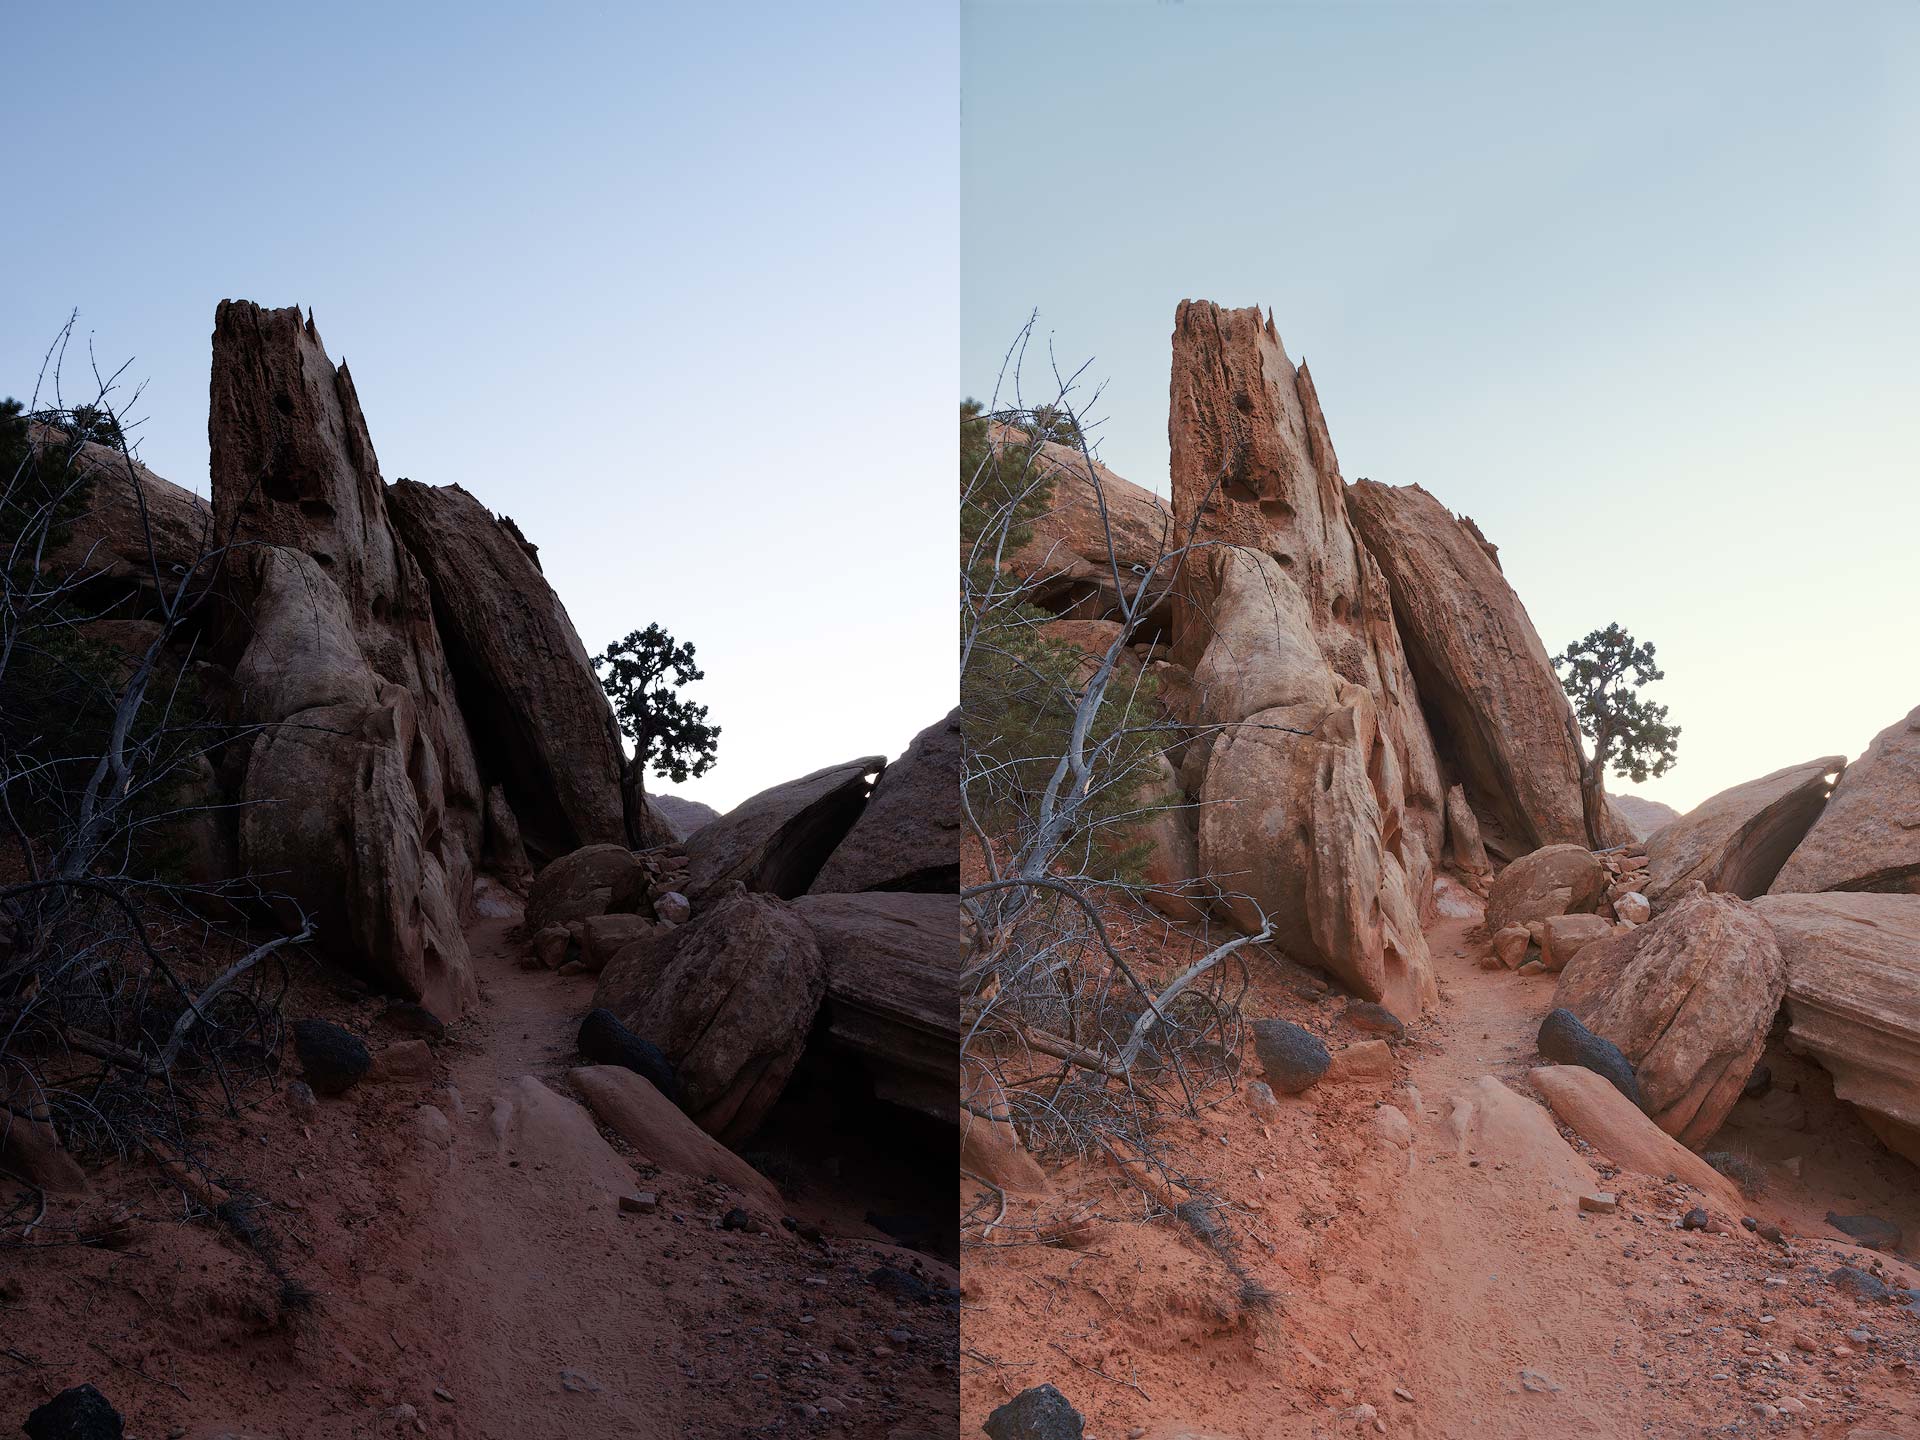
Balance Color has removed the slight magenta color cast (something my Canon EOS R5 always seems to add) by adding green across every tonal region. This is especially evident in the sky, which now looks less blue and purple. The rocks and ground are also closer to the coral and salmon colors that are natural to the environment where this image was captured.
Let's see what Balance Color can do with the second image.
Again, Balance Color has negated magenta's presence in the image, but (in my opinion) has added too much warmth to shadows and midtones in the foreground. The overall image also looks a bit dim and unnatural to me now.
Below is the same image from above, but with custom edits to Adjust Lighting and Color Balance to create a better, more natural look. I've included a screenshot of those edits at lower right (see below).
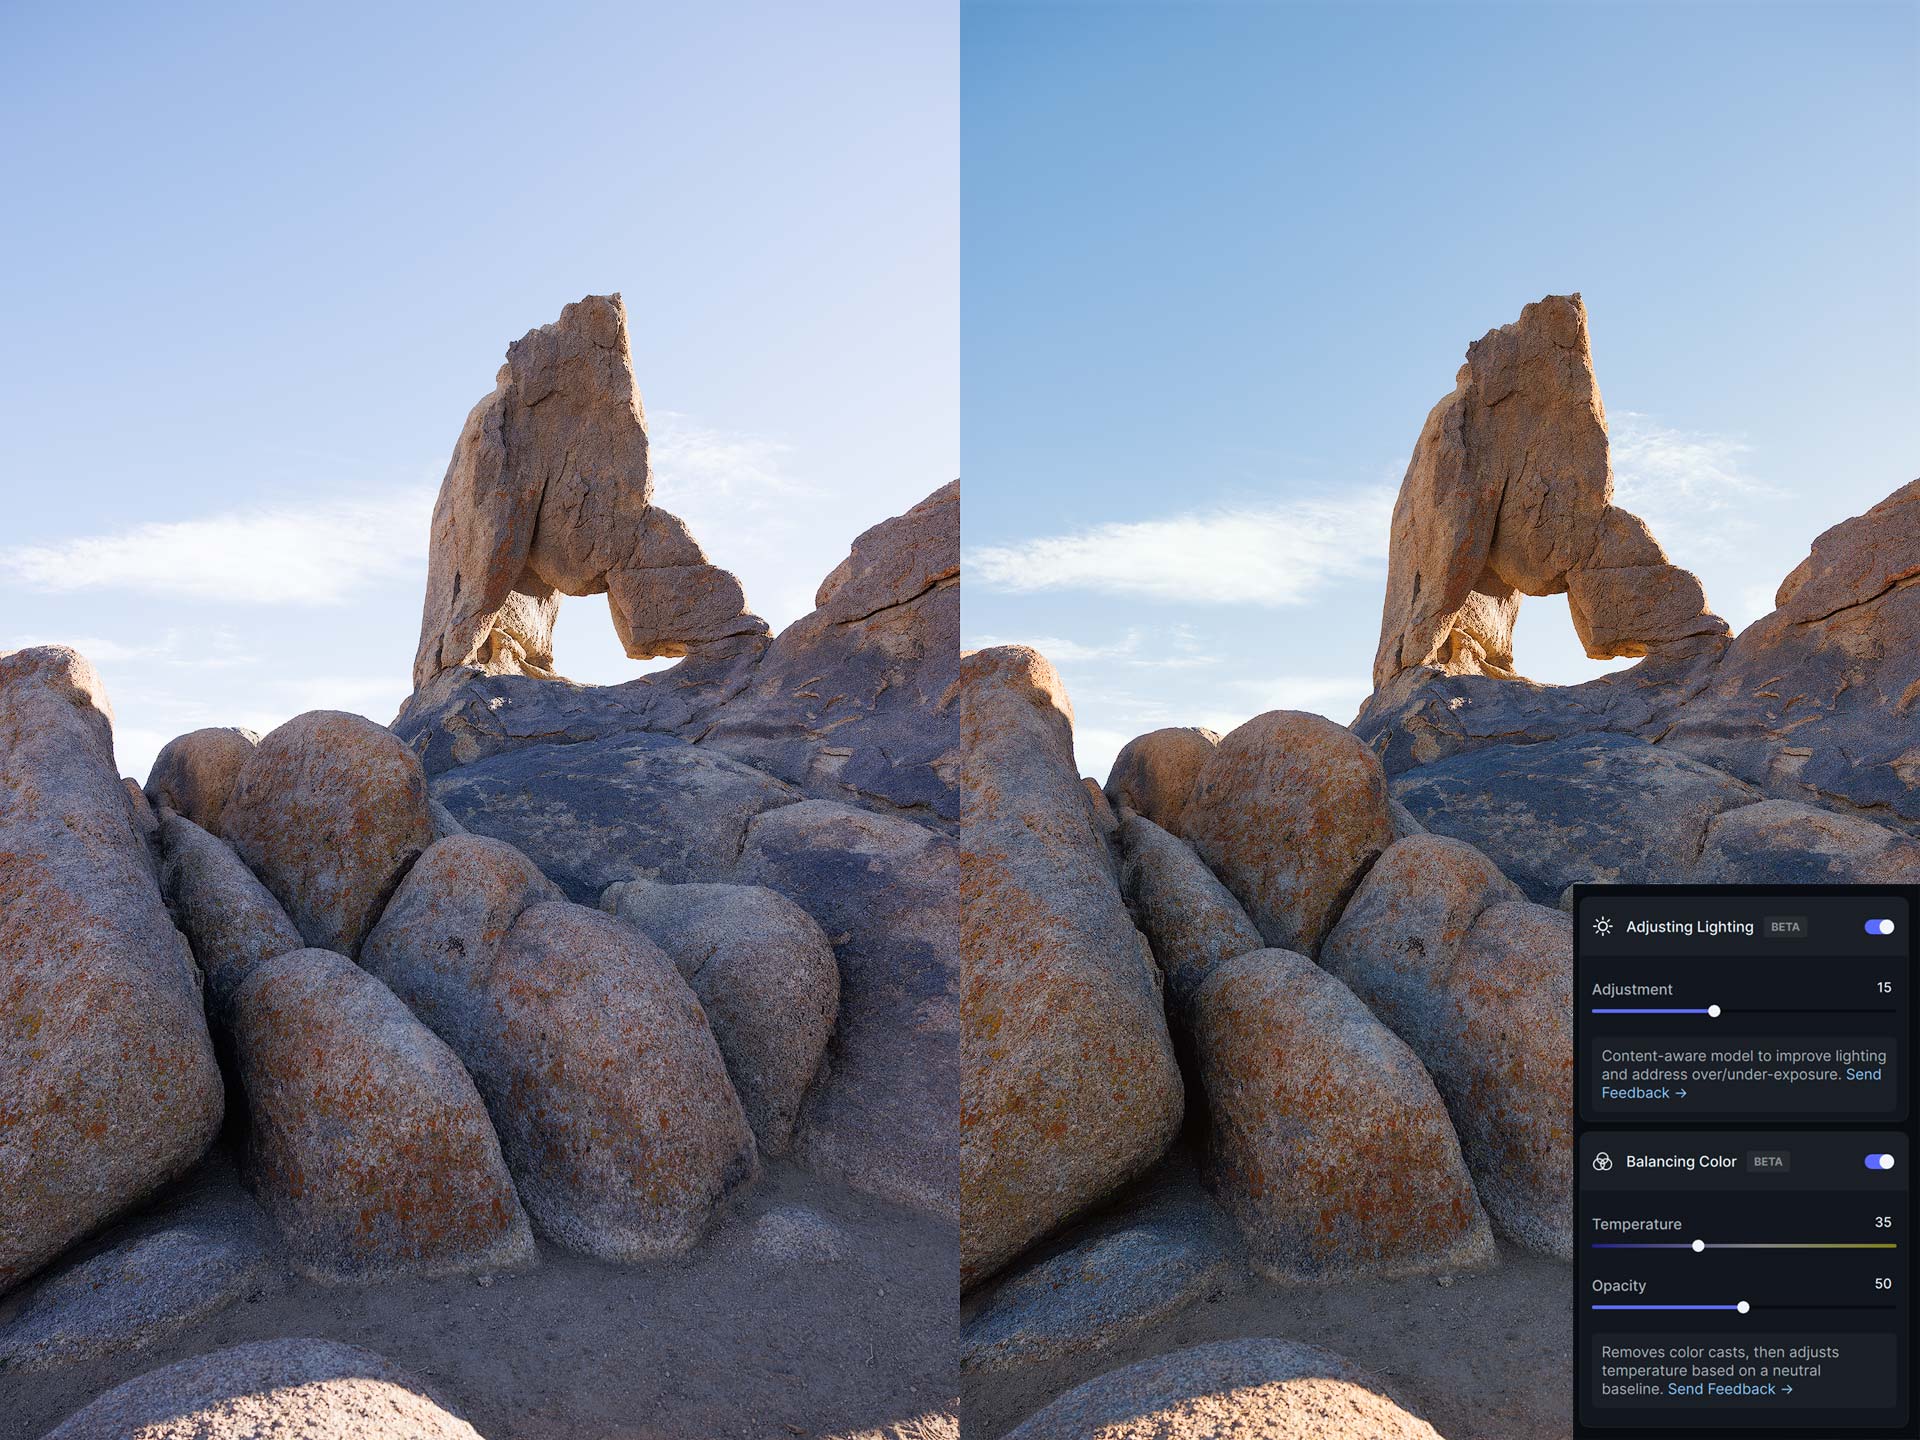
Much better. Adjust Lighting now retains more of the natural brightness of the original image, and Balance Color is now using a cooler temperature and lower opacity. The result is now more natural and less overdone than before.
For me, Balance Color isn't a color grading tool per se, but rather a technical adjustment tool that neutralizes neutrals and removes in-camera color bias. Like Adjust Lighting, it places colors in a more suitable place for additional color grading and adjustments using other software.
In my experience, Balance Color performs best when neutrality and color accuracy are important. Sometimes color cast can be a good thing, for it naturally embodies the colors produced by a colored, non-neutral light source. This is especially common in landscape photography with images captured at blue and golden hour. I recommend using Balance Color selectively, and adjusting its settings to more authentically represent the time and place an image was taken.
Final thoughts
Overall, Adjust Lighting and Balance Color are useful tools that build upon Photo AI's excellent denoising, sharpening, and upscaling tools. They don't necessarily replace the exposure and color tools in Lightroom and Photoshop, but rather provide photographers with an alternate toolset that is faster and less technical.
The main limitation of Photo AI v2 — at the time of this writing — is the lack of DNG file support for Adjust Lighting and Balance Color. The tools currently work only with TIFF images. That's a shame, for I'd rather use these tools at the beginning of a raw edit to create a baseline, not at the end when I typically generate a TIFF for upscaling and sharpening. Topaz has historically been very proactive with their product updates, so by the time you read this DNGs may be supported.
Also worth knowing, Photo AI v2 includes improved sharpening and denoise tools, especially with DNG files. The tools appear to retain more detail and texture than before, which is always a good thing.
With v2, Photo AI continues to improve, but still has a ways to go. Once the software fully supports DNG files, it will be a more useful tool in my photo editing workflow.
Download Photo AI v2
Version 2 is a free upgrade for anyone who purchased v1 within the past twelve months. This should include nearly every user of the software, for v1 was introduced less than a year ago. Existing users of Photo AI may download an update through the Topaz Labs account area.
If you don't already own Photo AI, you may download a free trial for macOS and Windows by clicking the button below.