Best Settings for Video on the Canon M50
Some links in this post are affiliate links, so if you purchase an item through one, I may receive a small commission at no extra cost to you. These credits go directly towards supporting this blog and my YouTube channel.
The Canon M50 is one of Canon’s most popular consumer cameras. It’s small, lightweight, feature-rich, and affordable. It’s a particularly popular camera with vloggers thanks to its fully articulating touchscreen, microphone jack, and solid-autofocusing system. The camera performs well out of the box, but there are simple edits you can make to achieve better, more professional-looking footage.
Optimum Canon M50 video settings
In this article, I’m going to help you set-up a brand new Canon M50 for recording video. These settings are the result of experimentation and shooting hours of footage over the course of two years.
Step one: Set mode dial to video
Find the circular mode dial on the top of the M50. Turn the dial to video/movie mode (indicated by the white video camera icon). This mode is used when shooting video and when editing video-related settings in the menu.
Step two: Turn off assistant interfaces
By default, the Canon M50 uses a simplified user interface for its menu. The interface may be more visually attractive, but we need to see the full menu. We also don’t want annoying help text getting in the way either, so we’ll turn that off as well.
- Go the fourth Display Level Settings tab and tap OK.
- Set Menu display to “Standard”
- Set Mode guide to “Disable”
- Set Feature guide to “Disable”
Step three: Edit shooting mode
The Canon M50 shoots video using a “Movie auto exposure” mode. This mode allows the M50 to automatically change aperture and shutter speed while filming. Sounds great in theory, but it’s better to control exposure yourself to achieve more consistent, professional-looking footage.
- Go to Shoot Menu 1
- Set Shooting mode to “Movie manual exposure”
Why is this preferable? Because professional filmmakers use fixed values for shutter speed to match frames-per-second. This is known as the 180-degree shutter rule. To find your target shutter speed, double the FPS, then round-up to the closest shutter value. For example, if recording at 24fps (which will be explained next in step four), 24×2 equals 48. The next highest shutter value is 1/50, which is close enough.
With shutter speed set to a fixed value, you may now control exposure using aperture and ISO. Outdoors in daylight, you will likely need neutral density filters to reduce the amount of light entering the lens to achieve proper exposure.
Step four: Edit movie record quality
The Canon M50 offers three video resolutions: FHD, HD, and 4K. Part four will explain 4K in detail, but for best results, FHD 23.98P (or 25P if in a PAL region) is the way to go. This mode supports dual-pixel autofocus and the frame-rate is what your eyes are accustomed to seeing in motion pictures.
- Go to Shoot Menu 1
- Set Movie rec size to “FHD 23.98p” (or “FHD 25p” if PAL)
Step five: Edit white balance
For photos, “Auto” white balance is perfectly fine (especially in RAW). But for video, “Auto” causes shifts in color temperature and tint while filming. This creates inconsistencies and looks unprofessional. Instead, set white balance to a fixed value. “Daylight” works particularly well because it’s the most color neutral and dependable.
- Go to Shoot Menu 3
- Set White balance to “Daylight (Approx. 5200k)
Step six: Edit picture styles
Picture styles control saturation, contrast, and sharpness. They’re used by the M50 to process JPGs and videos. (Note: picture styles are not used when shooting RAW). By default, the M50 uses the “Auto” picture style, which (again) is not a good option because it creates inconsistencies. Better to set this to a fixed value. For the majority of users, “Standard” will produce the best looking results.
- Go to Shoot menu 3
- Set Picture Style to “Standard”
If however you are an advanced user and intend to color grade footage in post, “Standard” is not your best bet. Check out Part Three of this Canon M50 Video Guide to learn how to customize Picture Styles for more gradable footage.
Step seven: Edit auto-focus
One of the Canon M50’s best features is its Dual-Pixel Autofocusing system. To use it, make sure that auto-focus is set to auto-focus with face tracking. This works brilliantly for vlogging and following subjects.
- Go to Shoot menu 4
- Set AF method to “AF (Face + Tracking)”
Step eight: Edit focus peaking
Another fantastic M50 feature is focus peaking. Enable peaking, set the camera to manual focus, and the preview screen will highlight areas in focus. Manual focus is preferable when capturing b-roll, pulling focus, or shooting any scene which doesn’t require tracking a subject. Controlling focus manually is an important video skill to learn, and thankfully the M50 makes it easy to use.
- Go to Shoot menu 5
- Set MF peaking settings to “On”
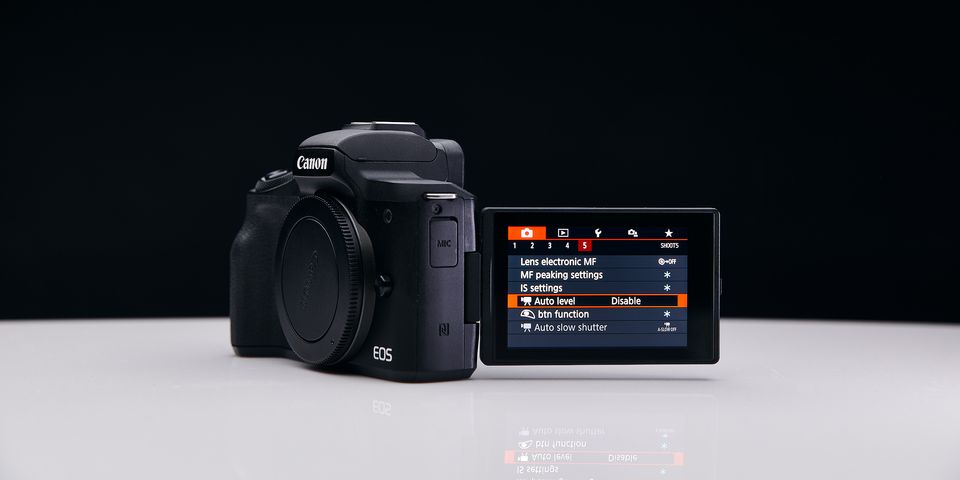
Step nine: Edit image stabilization
Digital image stabilization helps smooth and stabilize footage. This is especially noticeable when vlogging handheld. There is an additional option for “Enhanced”, but it’s too aggressive and looks unnatural. For best results handheld, select “Enable”.
- Go to Shoot menu 5
- Select IS Settings
- Set Digital IS to “Enable”
For shots where stabilizing a subject isn’t needed, set Digital IS to “Disable”. This turns off digital image stabilization and captures footage naturally without cropping.
Step ten: Use shutter button to start/stop recording
The Canon M50’s shutter button can be used to start/stop recording video. This is not enabled by default, but it can be turned on.
- Go to Shoot menu 5
- Select btn function
- Set Fully-press to “Start/stop mov rec”
Step eleven: Setup custom buttons for video
Most buttons on the M50 are editable and can be assigned to different functions. For shooting video, most buttons are fine as-is, but there are a couple which could be improved.
In video mode, the Flash button is set to white balance (“WB”). If you’re always shooting with a fixed white-balance (as explained earlier), this isn’t particularly useful. Assigning “PEAK” will instead enable/disable focus peaking when shooting manually.
Erase is set to “Picture Styles”. Again, not particularly helpful when shooting with a fixed style. Assigning “Display off” will instead enable/disable the rear display to conserve battery life.
- Go to Set Up 5 (Yellow Wrench tab)
- Select Custom Functions (C.Fn)
- Navigate to Screen 5 using arrow keys
- Press the SET button on the back of the camera
- Set Flash (lightning bolt) button to “PEAK”
- Set Erase (trash icon) button to “Display off”
Video
Below is a video where I walk through and explain all of the settings in this article.
Summary
Now your Canon M50 is optimized for shooting video! Remember when editing video settings that they are contextual to the video mode only. In other words, you can assign different functions for shooting photos using the other modes (Aperture Priority, Shutter Priority, etc) and those settings won’t conflict with video.
For more, check out the rest of the Canon M50 Video Guide.
- Part Two: Best EF-M lenses for video
- Part Three: Custom Picture Styles
- Part Four: Better 4K Video